
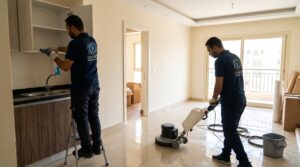
Moving into a new residence across Cairo or Giza is an exciting life milestone, but stepping into an unfurnished apartment or villa immediately exposes hidden sanitization challenges. Even if the property appears visually swept, microscopic construction silica dust, airborne plaster residue, biological debris from previous tenants, and accumulated grime inside closed kitchen cabinetry linger throughout the space.
Unpacking furniture, mattresses, and kitchenware into an unsterilized environment traps contaminants beneath heavy items and inside living areas. Performing comprehensive post-move deep cleaning while rooms are completely vacant provides an unobstructed window to access every floor joint, window track, and ventilation grill.
This technical preparation guide from the residential hygiene specialists at Galaxy Home Service outlines the engineering sequence, sanitization protocols, and surface-specific methodologies required to transform an empty property into a sterile, fresh, and welcoming home.
1. The Golden Rule: The “Top-to-Bottom, Dry-to-Wet” Protocol
In post-move and post-construction sanitization, sequencing dictates cleaning efficiency. Gravitational physics governs airborne dust; wiping floors before ceilings guarantees double work.
-
High-Altitude Dry De-Dusting: Begin by clearing ceiling cornices, light fixtures, chandelier fittings, and split AC return-air vents with electrostatic microfibers and industrial HEPA vacuums. Capturing fine dust in a dry state prevents it from streaking wet walls later.
-
Vertical Surface Decontamination: Wipe down painted wall surfaces, door frames, architraves, electrical switches, and interior closet faces.
-
Windows and Aluminum Tracks: Evacuate compacted sand and masonry grit from aluminum sliding window tracks before washing panoramic glass panes.
-
Floor Stripping and Neutralization: Floors represent the final phase. Scrubbing, extracting, and neutralizing tile, marble, or parquet surfaces ensures all settled debris is permanently evacuated from the property.
2. Kitchen Sanitization: Eliminating Hidden Lipid Resins and Micro-Pests
Kitchens harbor deep organic residues left behind by previous occupants, creating prime breeding grounds for cockroaches and ants:
Cabinet Interiors and Shelving
Vacuum the interior corners of upper and lower cabinets using narrow crevice nozzles to remove forgotten spices, loose flour dust, and insect droppings. Disinfect interior laminates, melamine shelves, and hinge hardware with hospital-grade, food-contact-safe quat solutions that destroy bacteria without leaving hazardous chemical aromas.
Exhaust Zones and Appliance Cavities
Thoroughly degrease range hood housings and duct entry points to eliminate oxidized grease films that generate persistent rancid odors. Disinfect and scrub open alcoves allocated for the refrigerator, dishwasher, and free-standing stove before major appliances are connected and set into place.
3. Bathroom Sterilization and Mineral Descaling
Bathrooms require targeted chemistry to dissolve mineral scaling, soap scum, and pathogenic bacterial biofilms:
-
Porcelain Fixture Descaling: Water supplies often deposit hard calcium carbonate scale around faucet bases, toilet bowls, and bidet nozzles. Apply buffered acidic descalers to melt mineral crusts without scratching polished chrome plating.
-
Grout Line Deep Detailing: Porous cementitious tile grout absorbs dirty runoff and mold spores. Scrub joints with an alkaline-oxygen cleaner and stiff nylon detailing brushes, followed by high-suction fluid recovery.
-
Drain Traps and Overflow Channels: Flush sink overflow cavities and floor siphon traps with bactericidal sanitizers to destroy sulfur-producing biofilms that cause sewer gas smells.
4. Floor Restoration: Navigating Diverse Substrates
Each flooring substrate reacts differently to moisture and mechanical action. Mismatched cleaning chemicals risk permanent structural damage:
-
Natural Marble and Terrazzo: Marble is calcium-based and chemically sensitive. Strictly avoid acidic descalers, vinegar, or harsh cleaners, which immediately etch and dull polished calcite surfaces. Use neutral-pH detergents and diamond-impregnated polishing pads for micro-abrasion restoration.
-
Glazed Ceramic and Porcelain Tiles: Resilient against mild alkaline scrubbers. Machine-scrub with rotary floor machines to lift embedded construction dust, paint flecks, and tape adhesives from textured surfaces.
-
HDF Laminate and Solid Hardwood: Vulnerable to edge-swelling and core warping when exposed to excessive standing water. Clean using damp microfiber flat mops with specialized wood-care solutions, followed by immediate dry buffing.
5. Frequently Asked Questions (FAQ)
How long does a full post-move deep cleaning take for a 3-bedroom apartment?
A standard 150–220 m² apartment typically requires 5 to 8 operational hours for a dedicated multi-technician crew, covering all internal cabinetry, window frames, bathrooms, and mechanized floor scrubbing.
Should post-move cleaning happen before or after furniture delivery?
Always schedule deep sanitization before furniture arrives. An empty property allows full access to baseboards, floors beneath planned beds, and open cabinet interiors, ensuring furnishings are unloaded onto pristine, sterile surfaces.
How does Galaxy Home Service calculate post-move deep cleaning rates?
Estimates are determined by total floor area (square meters), overall soiling severity (light move-in refresh vs. heavy post-finishing construction debris), the number of bathrooms, and specialized requests such as interior kitchen detailing or exterior window facades. Sharing photos or walk-through videos provides an accurate assessment.
Preparing to relocate to a new home across Cairo or Giza? Schedule your comprehensive, white-glove Post-Move Sanitization and Deep Cleaning Services with Galaxy Home Service today.